Audacity is a powerful, free audio editing software that offers a variety of features to enhance your recordings. One of the most popular and useful features is the noise reduction tool. This guide will walk you through the steps to effectively use Audacity for noise reduction, ensuring your audio is clear and professional.

Noise reduction can help reduce constant background sounds like hum, whistle, whine, buzz, and hiss (e.g., tape hiss, fan noise, or FM/webcast carrier noise). It doesn’t work well for individual clicks, pops, or irregular noises like traffic or audience sounds.
To use Noise reduction, you need a section of the audio that contains only the noise you want to remove. Note that it might be hard to remove noise if it’s very loud, variable, or if the music or speech isn’t much louder than the noise. Also, it’s challenging when noise frequencies are close to those of the music or speech.
For mains hum or a high-pitched whistle, try using a Notch Filter first before applying Noise Reduction.
- Install and Open Audacity
If you don’t have it installed yet, download and install Audacity from Filepuma or the official website. Open the application after installation is complete.

2. Import Your Audio File
To begin using Audacity noise reduction, you need to import the audio file you want to edit. Click on “File” in the top menu, select “Import,” and then choose “Audio.” Locate your file and click “Open.”
3. Select a Noise Sample
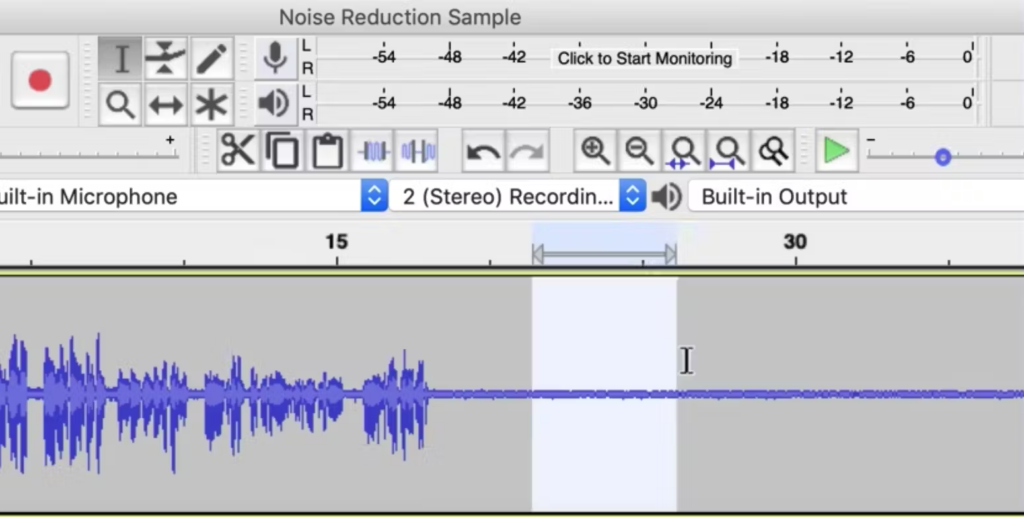
For effective noise reduction in Audacity, the software needs to identify the noise profile. Find a section of your recording that contains only the unwanted noise (such as static, hum, or background sounds). Click and drag to highlight this section.
4. Get Noise Profile
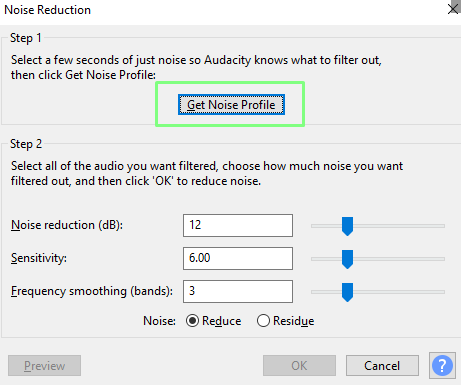
With the noise sample highlighted, go to the “Effect” menu and select “Noise Reduction.” In the window that appears, click on “Get Noise Profile.” Audacity will analyze the selected noise to create a noise profile.
5. Apply Noise Reduction
After getting the noise profile, select the entire track by clicking anywhere on the track and pressing “Ctrl + A” (or “Cmd + A” on Mac). Return to the “Effect” menu, choose “Noise Reduction” again, and this time adjust the settings according to your preference.
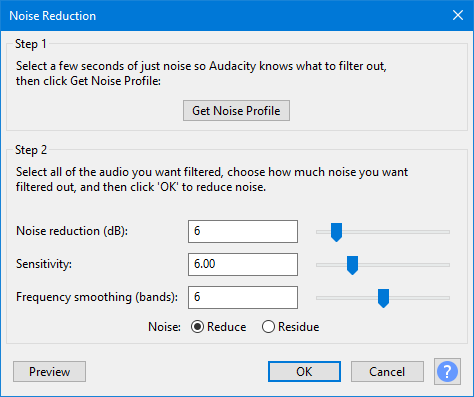
The key settings include:
Noise reduction (dB): Determines how much noise will be reduced.
Sensitivity: Controls how much of the audio Audacity considers as noise.
Frequency smoothing (bands): Adjusts the smoothness of the reduction process.
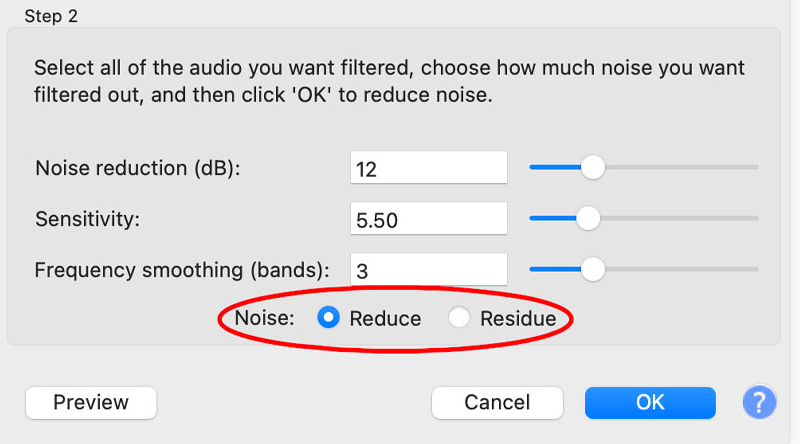
Noise: Reduce will remove the noise from the audio you have selected. This is usually the option that is required and is the default setting.
Noise: Residue can be selected to hear what will be filtered out, so you can ascertain what will be eliminated. If you choose this option and you can still hear parts of the audio you want to preserve along with the background noise that needs to be eliminated, you probably need to adjust the Noise Reduction or Sensitivity settings to get a better balance.
Once you have made your selections, click the Preview button to hear what the changes will do to your entire file. If you are happy with the results, click “OK” to apply the noise reduction.
6. Listen and Adjust
After applying noise reduction, it’s important to listen to the audio and make any necessary adjustments. While noise reduction can significantly improve the quality of your recordings, it can also affect the clarity of the desired audio in some cases.
Listen carefully to the processed audio and make note of any artifacts or changes in sound quality. If necessary, you can undo the noise reduction by pressing “Ctrl + Z” on your keyboard and adjust the settings before applying it again.
7. Export and Save Your Clean Audio
Once you are satisfied with the noise reduction, export your edited audio file. Click on “File,” then “Export,” and choose your preferred format (such as MP3, WAV, etc.). Save your file with a new name to avoid overwriting the original.
Improving audio quality in Audacity isn’t as simple as clicking one button and magically erasing all background noise from your recordings. It requires some skill and familiarity with the noise reduction tool. Nonetheless, the noise reduction feature is robust and relatively user-friendly. Even a few attempts at using it can yield significant improvements, particularly for spoken content. Even with default settings, you can enhance your audio files noticeably.
By following these steps, you can effectively use Audacity for noise reduction and enhance the quality of your audio recordings. Experiment with different settings and techniques to achieve the best results for your specific audio needs. With practice, you’ll become proficient in using Audacity’s noise reduction tools to produce clean and professional-quality audio. Hope this article will be helpful to you.